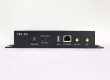


The NovaStar VX600 Pro is a six-port all-in-one controller for professional LEDビデオウォール. This updated guide shows AV integrators how to check pixel load, design port and source routing, configure layers, and commission an LED wall using the current product specification. NovaStar also writes its brand name as “Novastar” or “Nova Star”; all three refer to the same LED display control equipment.
簡潔に言うと、 NovaStar VX600 Proは、6つのギガビットイーサネットポート、390万画素の読み込み容量、最大出力幅10,240ピクセル、最大高さ8,192ピクセル、6×2K×1Kレイヤーリソースを備えたオールインワン4K LEDディスプレイコントローラーです。ビデオ処理、入力切り替え、レイヤー合成、出力管理を1つのラックマウントシャーシに統合しており、フロントパネル、NovaLCT、Unicoウェブページ、またはVICPアプリから制御できます。
Contents
1. NovaStar VX600 Proの概要と仕様
2. NovaStar VX600 Proの主な特長
3. はじめに:VX600 Proのセットアップ手順
4. VX600 Proでのレイヤーの作成と管理
5. 画面解像度と物理レイアウトの設定
6. 1つの表示レイアウトで複数の入力ソースを使用する
7. NovaStar VX600 Pro manual, firmware and 2026 changes
8. VX600 ProとVX400 Pro、VX1000 Pro、VX2000 Proの比較
9. NovaStar VX600 Pro よくある質問
10. Get a Verified VX600 Pro Configuration
1. NovaStar VX600 Proの概要と仕様
Novastar VX600 Proは真の オールインワンコントローラー: it integrates video processing, input switching, layer compositing and output management into a single industrial chassis, which can simplify a suitable signal chain; a redundant show still requires a separately engineered backup path. Whether you are deploying a fixed installation or managing a touring show, the VX600 Pro offers several modes and configuration tools that should be tested with the actual cabinets and sources. NovaStar positions it for medium and high-end rental, stage control systems and fine-pitch LED screens.
VX600 Proの主な仕様概要:
| 製品仕様 | VX600プロ |
| 製品タイプ | 映像処理と映像制御を統合したオールインワンLEDディスプレイコントローラー |
| 積載能力 | 3.9万画素 |
| 最大出力サイズ | 幅10,240ピクセル×高さ8,192ピクセル |
| イーサネット出力ポート | ギガビットイーサネット×6、ポートあたり650,000万ピクセル(8ビット入力) |
| レイヤーリソース | 6×2K×1K。4K×2Kレイヤーは4つのリソースを使用し、4K×1Kレイヤーは2つ、2K×1Kレイヤーは1つのリソースを使用します。 |
| 作業モード | ビデオコントローラー、光ファイバーコンバーター、バイパス |
| ビデオ入力 | HDMI 2.0(入力&ループ)×1、HDMI 1.3×2、3G-SDI(入力&ループ)×1、10G光ファイバー(オプション1、自動入力または出力)、USB 3.0メディア再生×1 |
| 最大入力解像度 | HDMI 2.0では4096×2160@60Hz、HDMI 1.3および3G-SDIでは1920×1080@60Hzに対応。 |
| HDCP | HDMI 2.0 では HDCP 1.4 および HDCP 2.2 に対応。HDMI 1.3 では HDCP 1.4 に対応。 |
| ビデオ出力 | ギガビットイーサネット×6、10G光ファイバー×2(OPT 1出力、OPT 2コピー、バックアップまたはループ出力)、HDMI 1.3モニタリング出力×1(1920×1080@60Hz)、3Dコネクタ×1 |
| 光ファイバー伝送距離 | シングルモードツインコアモジュール使用時最大10km、マルチモードツインコアモジュール使用時最大300m(光モジュールはオプション) |
| オーディオ | 3.5mmオーディオ入力×1、3.5mmオーディオ出力×1、サンプリングレート最大48kHz、HDMIソースとの音声同期、出力音量調整可能 |
| 管理 | 前面パネルLCD(ノブ付き)、NovaLCT、Unicoウェブページ、VICPアプリ。Unico制御およびカスケード接続用のイーサネットポート×2。ファームウェア、ログ、EDID用のUSB 2.0ポート×1。RS232ポート×1。ジェンロックIN/LOOPポート×1。光センサー×1。 |
| プリセット | 最大256個のユーザー定義プリセット、ワンボタン読み込みとレイアウトプレビュー機能付き |
| レイテンシ | 1–2 frames in video controller mode with low latency enabled (2–3 frames without); 0 frames in ByPass only with low latency enabled, and 0 frames in fiber converter mode |
| USB再生 | 単一パーティションのドライブ、NTFS / FAT32 / exFAT形式。jpg、jpeg、png、bmp形式の画像。H.264形式(最大3840×2160@30fps)またはH.265形式(最大3840×2160@60fps)のmp4ビデオ。AAC-LCオーディオ。 |
| バックアップと信頼性 | デバイス、入力ソース、イーサネットポート、OPT/イーサネットポート間のエンドツーエンドバックアップ。イーサネットポートのバックアップテスト。停電後、保存された設定が自動的に復元されます。 |
| 出力 | 100~240V~、50/60Hz、定格消費電力41W |
| 動作環境 | 0℃~50℃、相対湿度5%~85%(結露なきこと) |
| 寸法 | X |
| 重量 | 正味重量3.9kg、総重量6.5kg |
| 認定 | CE、FCC、IC、RCM、EAC、UL、CB、KC、RoHS |
Source: NovaStar VX600 Pro All-in-One Controller Specifications, document version V1.4.0, released 30 July 2026. Where a feature depends on third-party hardware — such as specific receiving cards, 3D glasses or optical modules — the condition is stated in the specification.
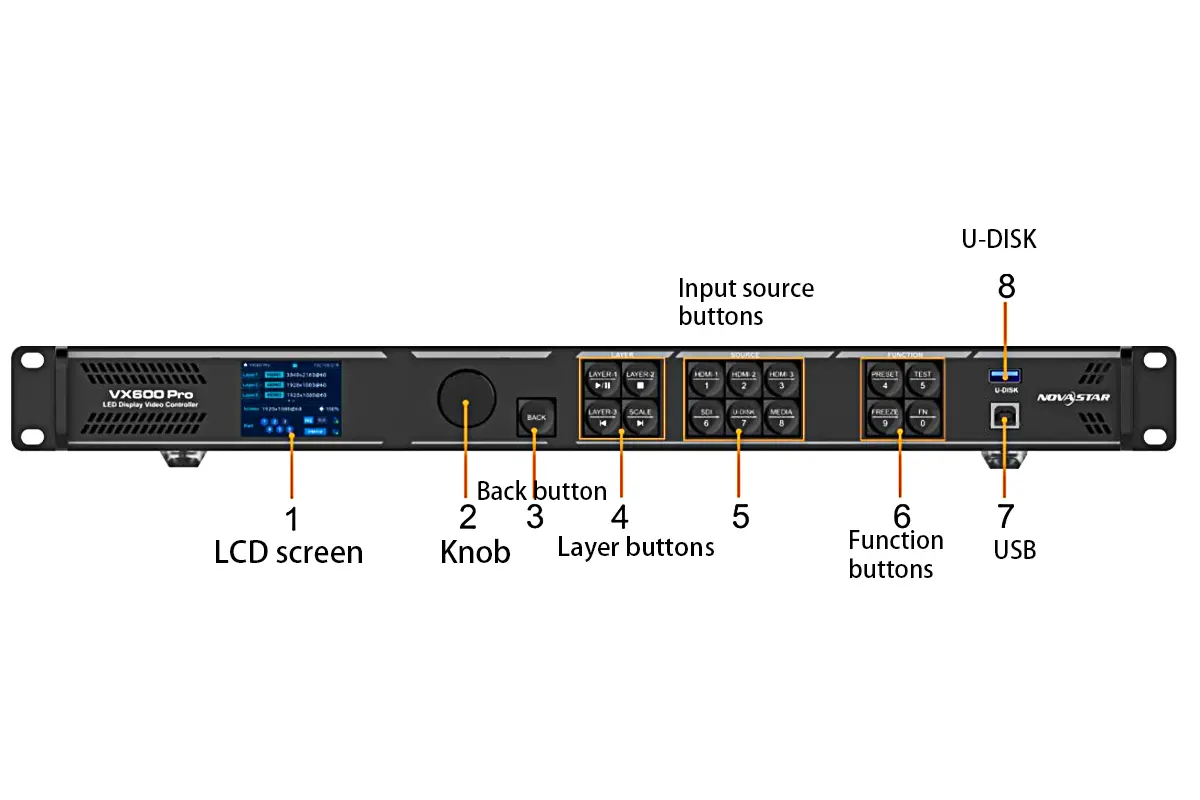
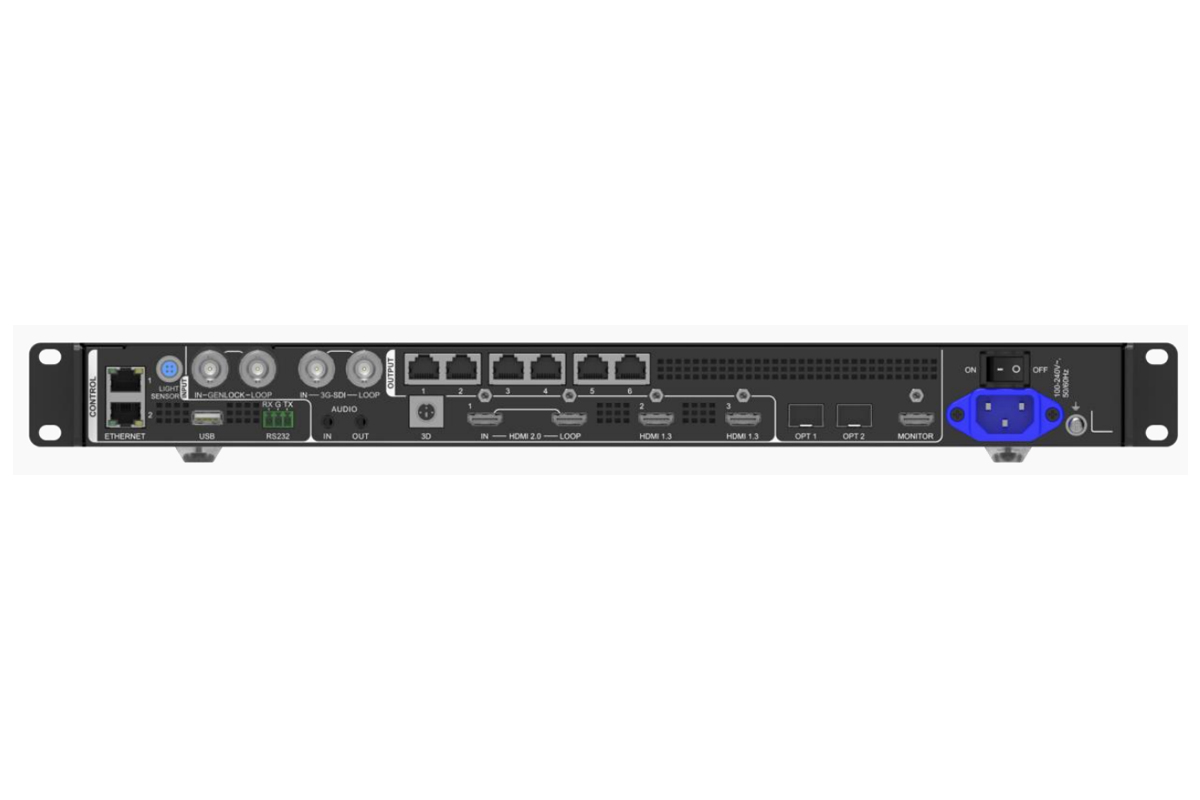
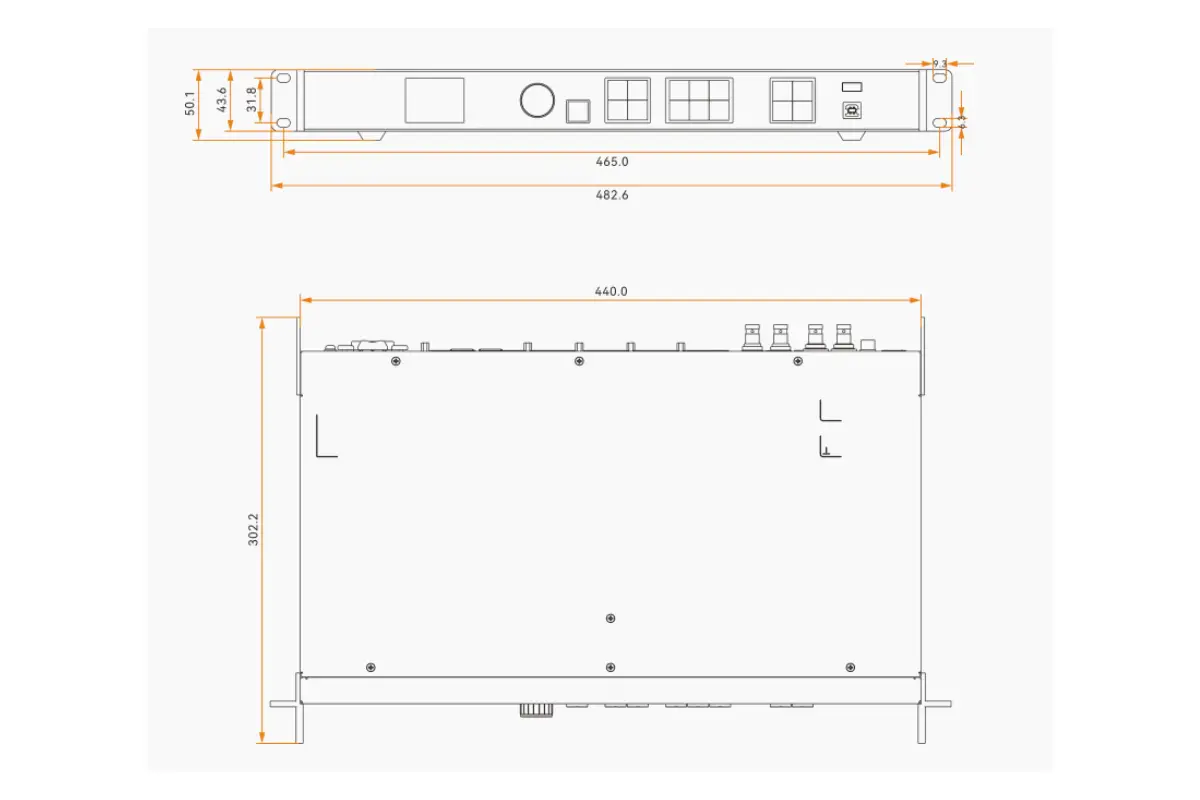
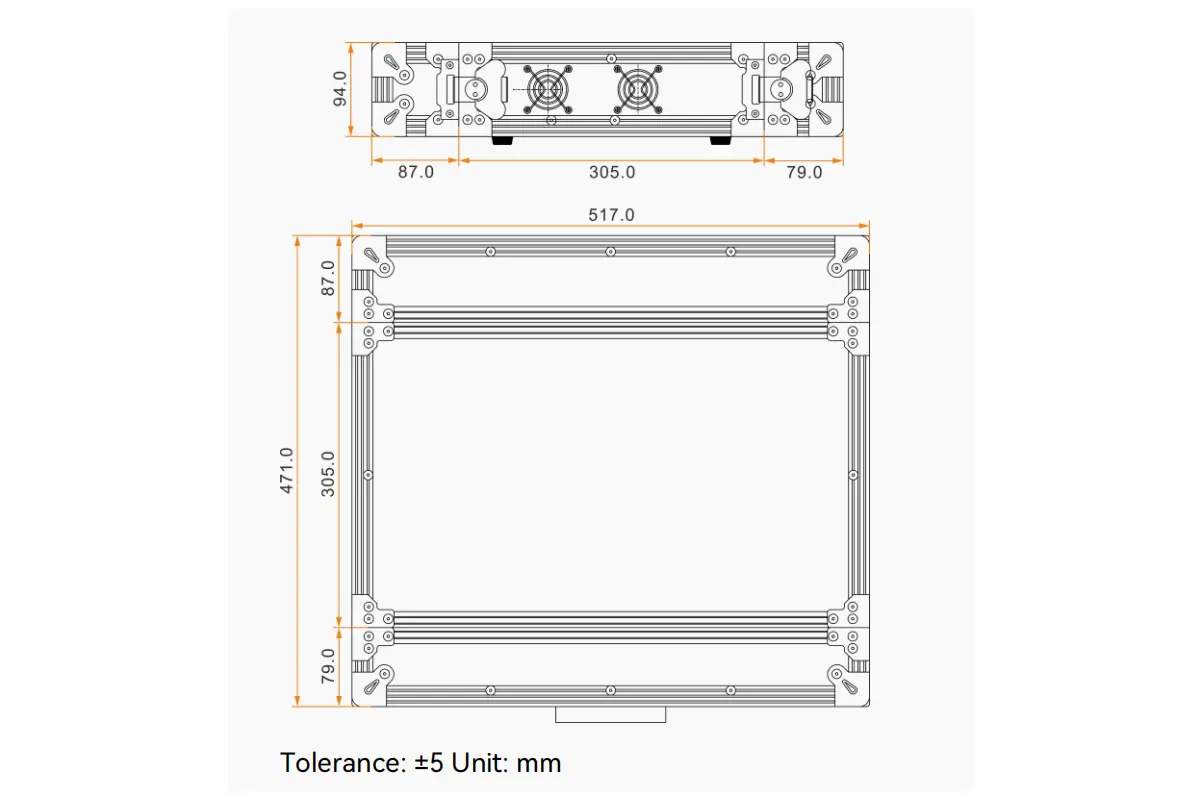
Specify the NovaStar VX600 Pro from a cabinet schedule rather than from the headline input format. Multiply each cabinet’s pixel width and height by its quantity, then assign those cabinets to actual Ethernet chains. Keep a drawing of the entire canvas and every port load.
2. NovaStar VX600 Proの主な特長
VX600 Proは、初心者からベテランまであらゆるユーザーに適した高度な機能を統合した、パワフルなオールインワンコントローラーとして際立っています。以下では、その主要な機能について詳しく解説します。
01. Video input and output capabilities
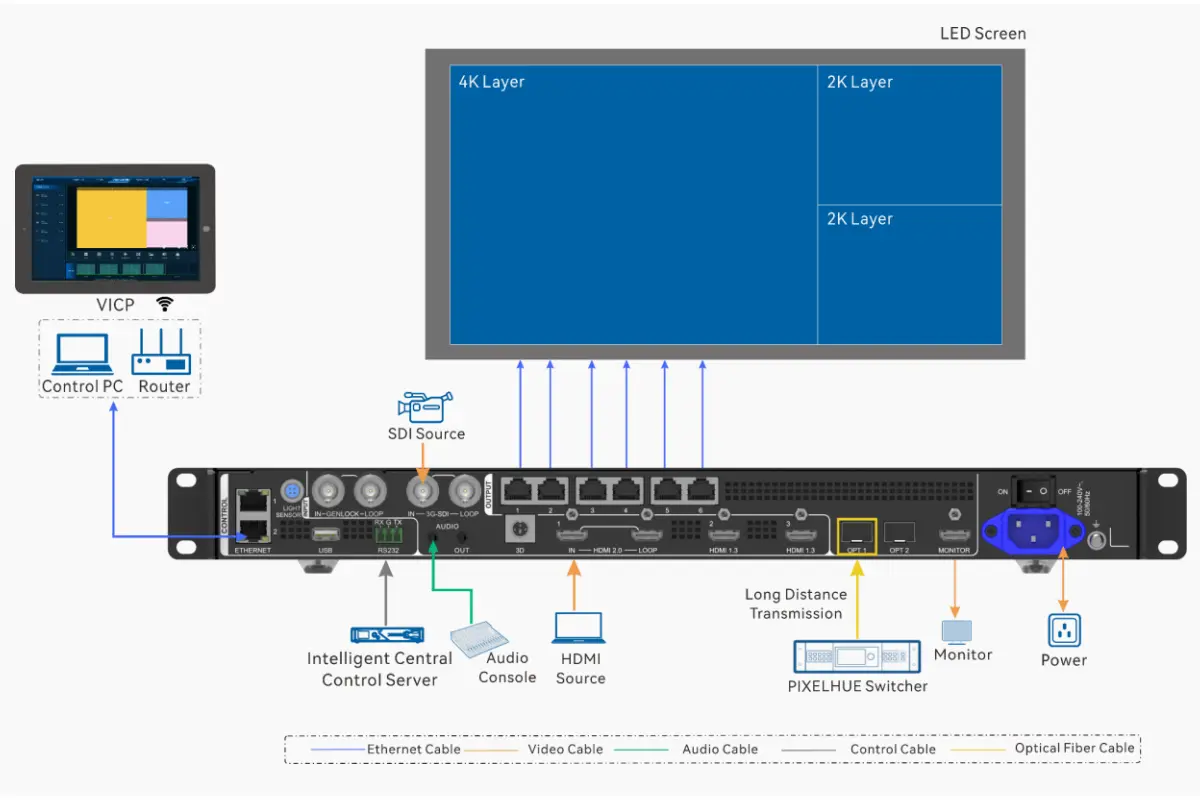
VX600 Proは、HDMI 2.0、HDMI 1.3、3G-SDI、10G光ファイバー、USB 3.0メディア再生など、複数のビデオ入力に対応し、それらをすべて同じ内部パイプラインで処理します。自己適応型のOPT 1ポートは、接続する機器に応じて入力コネクタとしても出力コネクタとしても機能するため、ほとんどの信号経路において別途光ファイバーコンバーターを用意する必要がありません。
主なハイライト:
- HDMI 2.0: 最大4096×2160@60Hz、8ビット、10ビット、12ビット入力、RGB 4:4:4 / YCbCr 4:4:4 / YCbCr 4:2:2サンプリング、HDCP 1.4およびHDCP 2.2、HDMI 2.0-1ループ出力に対応。
- HDMI 1.3 (×2): HDCP 1.4に対応し、最大1920×1080@60Hzの解像度を実現。ノートパソコン、メディアプレーヤー、および信頼性モニターに最適です。
- 3G-SDI: 放送用カメラやプロダクションルーター向けに、最大1920×1080@60Hzの解像度、デインターレース機能、ループ出力に対応。
- 10G光ファイバー: イーサネットポート1~6の出力をシングルモードのツインコアモジュール上で最大10kmまで送信するか、その出力をコピーしてバックアップします。
- USB 3.0: PCを接続せずに、USBドライブから直接画像や動画を即座に再生できます。
02. Layer management features
レイヤー容量は2K×1Kレイヤーリソース単位で測定され、VX600 Proは6つのレイヤーリソースを提供します。レイヤーは4K×2K(4リソース)、4K×1K(2リソース)、2K×1K(1リソース)の3つの仕様で作成できるため、1つの4Kレイヤーと2つの2Kレイヤー、または6つの2Kレイヤーのいずれも同じリソース容量内に収まります。各レイヤーのサイズ、位置、優先度、アスペクト比は個別に調整できます。
主な機能は次のとおりです。
- 6×2K×1Kレイヤーリソース: ピクチャーインピクチャー、分割画面、マルチカメラレイアウトをリアルタイムで構築します。
- 自由入力トリミング: 黒い境界線をトリミングするか、ソースの特定領域を分離します。
- 画像スケーリングモード: 全画面表示、ピクセル単位表示、カスタム設定が可能。
- テキストと画像要素: VX Proシリーズ全体に、テキスト、画像、天気、時刻などの要素を追加でき、設定もカスタマイズ可能です。
03. Video processing, color and calibration
The VX600 Pro uses SuperView III image quality processing with stepless output scaling and one-click full screen display. Output color management covers brightness, saturation, contrast and hue, and brightness and chroma can be calibrated at pixel level when the device is used together with NovaLCT and NovaStar calibration software. That calibration step is what removes color discrepancies between cabinets on a large fine-pitch wall.
04. オーディオ入出力機能
VX600 Proは、ビデオ機能に加えて、包括的なオーディオサポートも提供します。
- 音声付き: HDMIソースを自動的に追跡します。
- 独立したオーディオ: 外部ミキサーやコンソール用の3.5mmオーディオ入出力ジャックを搭載し、最大48kHzのサンプリングレートに対応。
- 音量調節: 出力音量は、デバイス前面パネルから調整できます。
05. Control options
VX600 Proの操作方法は4種類あるため、現場でノートパソコンに縛られることはありません。
- フロントパネル: LCDスクリーン、ロータリーノブ、レイヤーボタン、ショートカットキー(PRESET、TEST、FREEZE、FN)。
- ノバLCT: 画面設定、キャビネットライブラリ、受信カードマッピング、レイヤー制御、キャリブレーションを行うためのPCアプリケーション。
- Unicoのウェブページ: ブラウザを介してデバイスのイーサネット制御ポートを制御する。
- VICPアプリ: モバイル制御および監視。
ノブとBACKボタンを3秒以上同時に押し続けると、前面パネルのボタンをロックまたはロック解除できます。これは、デバイスが公共の場所やアクセスしやすい場所に設置されている場合に便利です。
3. はじめに:VX600 Proのセットアップ手順
VX600 Proのセットアップには、必要なケーブルの接続、フロントパネルまたはNovaLCTを介した基本設定の構成、およびコントローラーとLEDスクリーン間の適切な通信の確認が含まれます。
01. Initial steps
- デバイスをマウントします。 VX600 Proは、寸法482.6×302.2×50.1mm、正味重量3.9kgのユニットです。水平に設置してください。垂直または逆さまに取り付けないでください。ラックマウントする場合は、M5×8ネジを8本以上使用し、ラックの耐荷重が15kg以上であることを確認してください。
- 電源を接続: 付属の電源コードを100~240V、50/60Hzの電源で使用してください。定格消費電力は41Wです。
- 入力ソースを添付します: プロジェクトの要件に応じて、HDMI、SDI、または光ファイバーケーブルを接続してください。
- リンクイーサネットポート: 6つのギガビットイーサネットポートを対応する LEDキャビネット 受信カードを通じて。
- 電源オン: 電源ボタンを押して、システムが初期化されるまでお待ちください。停電後、以前に保存された設定は自動的に復元されます。
電源を入れたら、前面パネルのノブを使ってLCDメニューを操作し、輝度、入力ソース、EDID設定などの重要なパラメータを設定します。マルチレイヤー作業の場合は、制御用PCをイーサネット制御ポートのいずれかに接続し、NovaLCTで作業を続行します。
4. VX600 Proでのレイヤーの作成と管理
レイヤー管理機能は、プロフェッショナル向けビデオウォールコントローラーであるNovastar VX600 Proの強みの一つです。6つの2K×1Kレイヤーリソースにより、ピクチャーインピクチャー、ライブスコアオーバーレイ、マルチカメラモニタリングといったダイナミックな合成が可能になり、これらすべてがオールインワンコントローラー内でリアルタイムに処理されます。
NovaLCT(NovaStarのPCソフトウェア)、フロントパネルのLCDメニュー、Unicoウェブインターフェース、またはVICPアプリを使用して、レイヤーを作成および調整できます。以下の手順では、基本的なワークフローについて説明します。
01. Access layer settings
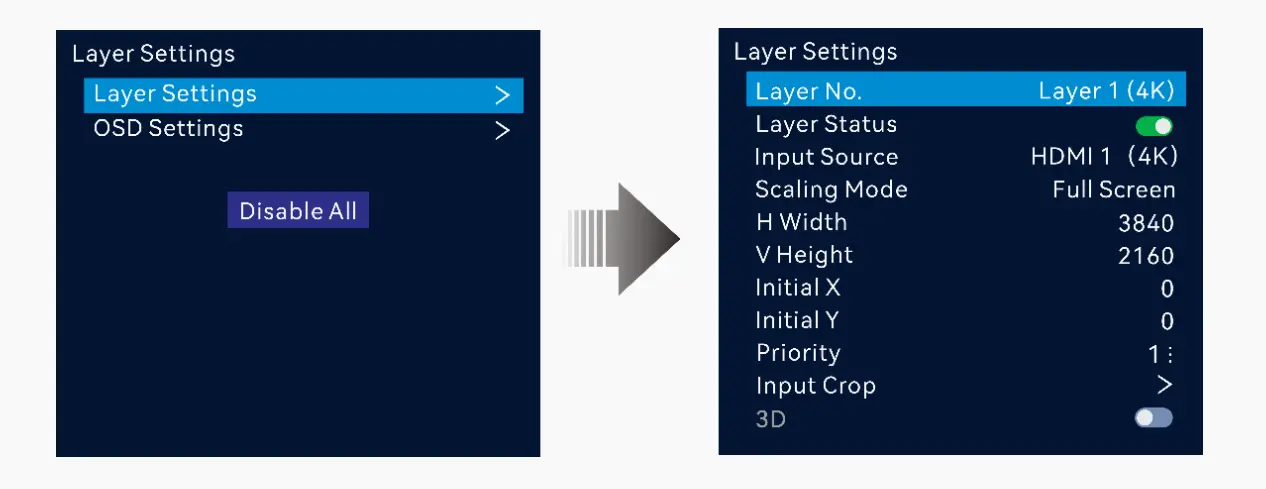
まず、レイヤー管理セクションに入ります。NovaLCTでは、[画面]タブに移動し、[レイヤー管理]を選択して[レイヤーの追加]をクリックします。デバイスを直接操作する場合は、フロントパネルのノブを回して[システム設定] > [レイヤー設定]に移動し、[レイヤーの追加]を選択するか、フロントパネルのLAYER 1~3ボタンのいずれかを押します。新しいレイヤーはそれぞれ、HDMI 1、SDI、または内蔵USB再生などのアクティブな入力ソースにリンクする必要があります。
02. Configure layer properties
Once a layer is created, define its visual behavior. Assign the input source, then adjust its size and on-screen position using X/Y coordinates or drag-and-drop in NovaLCT. Set the layer’s priority (Z-order) to control which content appears on top — critical when overlapping graphics and video. Choose a scaling mode: Full Screen stretches the source, Pixel-to-Pixel preserves the original resolution, and Custom lets you fine-tune the aspect ratio without distortion.
03. Fine-tune display and source details
Enhance visual quality with per-layer color adjustments — brightness, contrast, saturation and hue — to match other layers or correct source inconsistencies. Use the input crop function to trim black borders or zoom into a specific region of the source, for example isolating a presenter from a wide shot. Text and image elements such as event names or channel IDs can be placed over any layer through the preset and element controls.
VX600 Proはレイヤーのリソースを解像度ごとに割り当てることに注意してください。4K×2Kレイヤーは6つの2K×1Kリソースのうち4つを消費し、4K×1Kレイヤーは2つを消費し、2K×1Kレイヤーは1つを消費します。リソースの制限内に収まるようにレイアウトを計画し、リソース警告が発生しないようにしてください。
04. Example workflow
| 行動 | 詳細説明 |
| レイヤーを追加 | レイヤーを作成し、HDMI 2.0、SDI、USBなどの入力ソースを割り当てます。 |
| 優先度を設定 | 優先度の高いレイヤーは優先度の低いレイヤーの上に表示されます。レイヤー化されたビジュアルに合わせて調整してください。 |
| スケーリングを設定 | ソースがレイヤーをどのように埋めるかに応じて、フルスクリーン、ピクセル単位、またはカスタム設定を選択できます。 |
| プリセットを保存する | レイアウトを256個のプリセットのいずれかに保存すれば、ボタン一つでシーン全体を呼び出すことができます。 |
When designing a show on the NovaStar VX600 Pro, draw every simultaneous layer at its intended size. The six resource units are a processing budget; the physical LED load is a separate output budget. Both checks must pass.
5. 画面解像度と物理レイアウトの設定
VX600 ProでLEDウォール全体にコンテンツを表示するには、画面の解像度と物理的なレイアウトを正しく設定することが不可欠です。この設定は、 NovaStarの公式制御ソフトウェアであるNovaLCTで行います。
Remember the loading limits while you plan: 3.9 million pixels in total, a maximum output width of 10,240 pixels, a maximum height of 8,192 pixels and 650,000 pixels per Ethernet port at 8-bit input. For irregular layouts, the current specification distinguishes free topology, which calculates Ethernet-port loading from the actual cabinets, from non-free topology, which uses the maximum circumscribed rectangle. Free topology requires specific receiving cards. Confirm the card model and selected mode before promising a higher usable port load.
01. Define your cabinet type
NovaLCTを開き、「画面」>「キャビネットライブラリ」に進みます。「追加」をクリックして新しいキャビネットモデルを作成します。以下の情報を入力します。
- キャビネットの幅と高さをピクセル単位で指定します(例:256×256)。
- スキャンタイプ(例:1/8または1/16 - 受信カードの仕様を確認してください)。
- キャビネットを保存します。キャビネットの種類ごとに1回だけ実行する必要があります。
02. Set total screen size
画面設定で、先ほど作成したキャビネットを選択します。次に、以下を入力します。
- キャビネット列数:縦に積み重ねられたキャビネットの数。
- キャビネット列数:水平に配置されたキャビネットの数。
このソフトウェアは、画面全体の解像度を自動的に計算します(例えば、キャビネット10台×256ピクセル=幅2560ピクセル)。
03. Assign the starting port and direction
クイック構成で、以下を設定します。
- 開始ポート:通常はポート1(物理的な最初の接続と一致する必要があります)。
- データフロー(正面図):ケーブル配線の方向に合わせて選択してください。通常は左から右、上から下です。
画面の開始位置が別の角(例えば左下隅)から始まる場合は、それに応じて調整してください。設定が間違っていると、画像が反転したり、ずれて表示されたりします。
04. Preview and verify
「プレビュー」をクリックするとシミュレーション出力が表示され、「送信」を押すとNovaLCT経由でレイアウトがVX600 Proに適用されます。受信カードが対応している場合は、マッピングモードを使用して各キャビネットを論理IDで点灯させ、ソフトウェアレイアウトが実際の配線と一致していることを確認できます。また、このデバイスにはイーサネットポートのバックアップテスト機能があり、ケーブルを抜くことなく、事前に保存されたイメージ、バックアップイーサネットポート、バックアップデバイスをチェックできます。
この手順が完了すると、入力ソースは画面全体に正しく拡大縮小されます。レイヤーや高度なエフェクトは正しく設定された画面でのみ正しく表示されるため、レイヤー管理の前にこの手順を実行してください。
For an irregular wall on the NovaStar VX600 Pro, ask whether the chosen receiving cards support free topology. If they do not, plan against the non-free bounding rectangle and confirm each of the six port loads before shipping the cabinets.
6. 1つの表示レイアウトで複数の入力ソースを使用する
Novastar VX600 Pro lets you combine up to six input sources — HDMI cameras, SDI feeds, USB media players, computers or fiber signals — into a single cohesive display using its layer system. A separate switcher or scaler may still be necessary when the planned source count, switching workflow or processing needs exceed the controller configuration.
01. Connect all input sources
利用可能なポートにデバイスを接続します。
- HDMI 2.0: 4K対応のコンピューター、メディアサーバー、カメラ(最大4096×2160@60Hz)に対応。
- HDMI 1.3 (×2): ノートパソコン、メディアプレーヤー、および信頼性モニター向け。
- 3G-SDI: 放送用カメラおよび業務用ビデオルーター向け。
- OPT(光ファイバー): 長距離伝送のため、または出力のコピーやバックアップのため。
- USB 3.0再生: USBドライブからmp4形式の動画や画像を直接読み込む。
続行する前に、各ソースの電源がオンになっていて、有効な信号を出力していることを確認してください。
02. Create a layer for each source
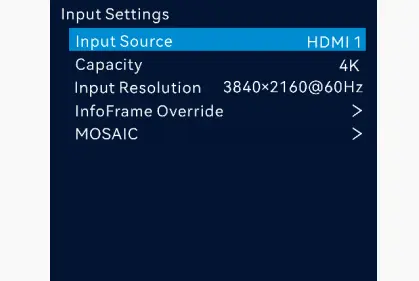
NovaLCT で、[画面] > [レイヤー管理] に移動し、入力ごとに [レイヤーの追加] をクリックします。
- ソースを対応するポート(例:HDMI 1、SDI、USB)に設定してください。
- 位置とサイズを調整して、ウィンドウを好きな場所に配置してください。
- 重要なコンテンツが常に最前面に表示されるように、優先度(Zオーダー)を設定します。
解像度を混在させることも可能です。例えば、背景に4K HDMIフィードを使用し、ピクチャーインピクチャーウィンドウに1080p SDIカメラの映像を表示するといったことができます。ただし、リソースコストには注意が必要です。この組み合わせでは、6つの2K×1Kレイヤーリソースのうち、4+1=5個を使用します。
03. Optimize scaling and crop
各レイヤーごとに、スケーリング モードを選択します。
- 全画面表示: ソースのサイズをレイヤー領域全体に拡大縮小します。
- ピクセル単位: 元の解像度を維持し、必要に応じて黒帯を追加します。
- カスタム: スケール、オフセット、アスペクト比を手動で調整します。
入力クロップ機能を使用すると、関心のある領域を拡大表示できます。たとえば、4Kデスクトップ画面から特定のアプリケーションウィンドウだけを表示するように切り抜くことができます。
04. Manage audio (if needed)
一度に出力できるオーディオソースは1つだけです。システム設定 > オーディオで以下を選択してください。
- 音声付き: 現在アクティブなHDMIレイヤーに従います。
- 独立したオーディオ: 外部ミキサーやコンソールには、3.5mm入力端子を使用してください。
出力音量は前面パネルから調整できます。
ヒント:画像が予期しない動作をする場合は、まず仕様書に記載されている機能制限を確認してください。3Dモードと入力クロップは同時に使用できません。低遅延を実現するには、イーサネットポートに接続されたすべてのキャビネットが外接矩形の上部に揃っている必要があります。また、バイパスモードではビデオ処理機能は使用できません。さらに、総容量が3.9万画素以内であることを確認してください。
Save a simple fallback scene on the NovaStar VX600 Pro with one known-good input. During acceptance, disconnect each primary source in turn and confirm the designed backup behavior; a feature list is not proof that the installed backup path works.
7. NovaStar VX600 Pro manual, firmware and 2026 changes
Document check, November 2026: The NovaStar VX600 Pro All-in-One Controller Specifications V1.4.0, dated 30 July 2026, supersedes the V1.0.1 file cited by the earlier version of this article. NovaStar’s VX Pro Series User Manual V1.4.2 and VX600 Pro firmware V1.4.1 are listed on its current product page. Verify the actual hardware and installed firmware before following a menu sequence or importing another show’s settings.
For the NovaStar VX600 Pro, the revision adds a practical distinction between free and non-free topology. Free topology calculates port load from the cabinets actually connected, but it requires specific receiving cards. Non-free topology calculates the maximum bounding rectangle. Request the receiving-card part number and test the screen map in software before using an irregular-canvas capacity estimate in a quote.
The specification also describes up to five configuration restore points with a combined 1 GB limit. A restore point can recover a saved configuration after a mistaken edit; it does not replace a second device, a spare source, or backup cabling. The NovaStar VX600 Pro offers backup relationships for devices, sources, Ethernet ports, optical and Ethernet paths, and dual receiving cards, but each path has to be built, configured and tested.
For a camera-facing wall, the NovaStar VX600 Pro can reduce デバイス delay to zero frames when low latency and ByPass are enabled together. Video Controller mode retains processing and layer functions but has different latency. ByPass disables video processing, so a design that needs scaling or multiple composited layers cannot simply assume the zero-frame figure. Measure the complete camera-to-screen path in the intended mode.
Use the quick start guide for connector identification, the V1.4.0 specification for limits and mode restrictions, and the V1.4.2 user manual for current menu steps. Obtain firmware through the manufacturer’s official distribution for the specific unit. EagerLEDさん NovaStar制御ソフトウェアページ explains the tools used for screen setup; keep a copy of the tested configuration before any update.
8. VX600 ProとVX400 Pro、VX1000 Pro、VX2000 Proの比較
NovaStarのVX Proシリーズは、4ポート、6ポート、10ポート、20ポートの構成で提供されており、VX600 Proは6ポートモデルです。シリーズの全モデルがHDMI 2.0経由で4096×2160@60Hzの真の4K入力と最大256のプリセットをサポートしているため、購入の決め手は通常、容量とレイヤー割り当てになります。
| モデル | レイヤー割り当て(公式) | 最適 |
| VX400プロ | 6×2K層、または1×4K層+2×2K層 | 小型スクリーンや軽量なショーでは、イーサネットポートが4つあれば十分です。 |
| VX600プロ | 6×2K層、または1×4K層+2×2K層 | 最大3.9万画素の単体4Kスクリーン。レンタル、ステージ、ファインピッチ設置に対応。 |
| VX1000プロ | 6×2K層、または1×4K層+2×2K層 | より多くのイーサネットポートとより高い負荷容量を必要とする大型スクリーン |
| VX2000プロ | 12×2K、6×DL、または3×4Kレイヤー | 複数の4K番組と複雑なマルチウィンドウ制作 |
実際的には:
- VX600 Proをお選びください 4Kスクリーン1台、または少数のスクリーンが390万ピクセル以内に収まり、中級または高級レンタル用またはステージ用リグ向けに、ビデオ処理、光ファイバー変換、バイパスを1つのボックスにまとめたい場合。
- にステップアップ VX1000プロ 壁のサイズが3.9万ピクセルを超えた場合、または負荷を分散するためにイーサネットポートがもっと必要になった場合。
- にステップアップ VX2000プロ 制作において、一度に3つの4Kレイヤー、または12の2Kレイヤーが必要な場合。
- より小さなクラスを比較するのですか? 現場の声を力強いメッセージへ。 VX400 ProとVX400の比較 実際に重要な8つの違いを網羅しています。
フルビデオ処理ではなく、長距離信号伝送のみが必要な場合は、CVT8-5GSのような専用ファイバーコンバーターがよりシンプルな解決策となることが多いです。また、LEDキャビネット制御ではなく、マルチウィンドウビデオウォールのスプライシングが目的の場合は、H9ビデオウォールスプライサーと比較検討してください。ステージLEDスクリーンの総合的なプロジェクトについては、キャビネットの選択、リギング、ピクセルピッチに関するガイドをご参照ください。
Compare the NovaStar VX600 Pro with larger models using the complete port map, 10-bit needs and simultaneous layer scene. A higher total pixel rating alone cannot fix a missing connector, incompatible receiving card or insufficient optical route.
9. NovaStar VX600 Pro よくある質問
These questions address the checks that usually delay a controller purchase or a live commissioning day.
01. What is the NovaStar VX600 Pro output limit?
The NovaStar VX600 Pro has six Gigabit Ethernet outputs and a device load limit of 3.9 million pixels. Its 10,240-pixel maximum width and 8,192-pixel maximum height are separate boundaries; neither increases the total pixel budget. Check each port and the exact cabinet map.
02. Does free topology work with every receiving card?
No. The V1.4.0 specification requires specific receiving cards for free topology. Confirm the receiving-card model before calculating load from actual cabinet shapes; non-free topology uses the bounding rectangle.
03. Can I combine a 4K layer with other layers?
Yes, within the six 2K × 1K layer resources. A 4K × 2K layer consumes four resources, leaving two for 2K × 1K layers. Test the actual source formats and the complete scene.
04. Is ByPass always zero latency?
No. The documented zero-frame device delay requires both ByPass mode and low latency. ByPass also removes video processing, and the camera, switcher, receiving cards and LED scan add their own delay.
05. How should I back up a live wall?
Draw and configure the primary and secondary source, device, port and optical paths required by the show. Use the Ethernet port backup test and simulate a failure before handover. A restore point is for configuration recovery, not live hardware redundancy.
06. Which document and firmware versions should I check?
The current NovaStar product page lists VX600 Pro Specifications V1.4.0, VX Pro Series User Manual V1.4.2 and VX600 Pro firmware V1.4.1. Confirm the installed device revision and obtain files from the manufacturer before upgrading.
07. Why is part of my wall blank?
Compare the cabinet pixel size, row and column count, starting Ethernet port, cable order and data direction with the software map. Run mapping and a test pattern; then check whether one port exceeds its permitted load.
08. Can a 4K input drive a native 4K LED canvas on one unit?
No. An accepted 4K video input can be scaled, but a 3840 × 2160 native LED canvas contains 8.29 million pixels and exceeds the 3.9-million-pixel output limit. Use a larger or multi-controller design.
10. Get a Verified VX600 Pro Configuration
これで、NovaStar VX600 Proオールインワンコントローラー上で、マルチソースコンテンツを指定、設定、レイヤー化、制御するために必要なすべてが揃いました。壁面に対して390万ピクセルの解像度を確認することから、NovaLCTで画面レイアウトを定義すること、ライブカメラ、再生ファイル、コンピューターフィードを1つのディスプレイに組み合わせることまで、すべてが可能です。
初めて設定する場合は、信号の流れとスケーリングをテストするために、シンプルな2層レイアウト(例えば、フルスクリーンの背景とPIPカメラ)から始めてください。それが確実に動作するようになったら、より複雑なデザインに拡張し、それぞれの動作設定をプリセットとして保存しておけば、ボタン一つで同じ番組を呼び出すことができます。
VX600 Proを中心としたステージ、レンタル、またはファインピッチ設置を計画中ですか? 問合せ EagerLED to check the LED wall and controller マッチングパッケージとして出荷するため、ハードウェア出荷前にキャビネットの積載量、ポート配置、コントローラー容量などを確認します。画面サイズ、ピクセルピッチ、キャビネットの種類をお知らせいただければ、構成を確認いたします。
送信する EagerLED the cabinet pixel dimensions, screen layout, source formats and receiving-card model when asking about the NovaStar VX600 Pro. Those details let our engineers check capacity, topology and backup requirements against the actual project.