

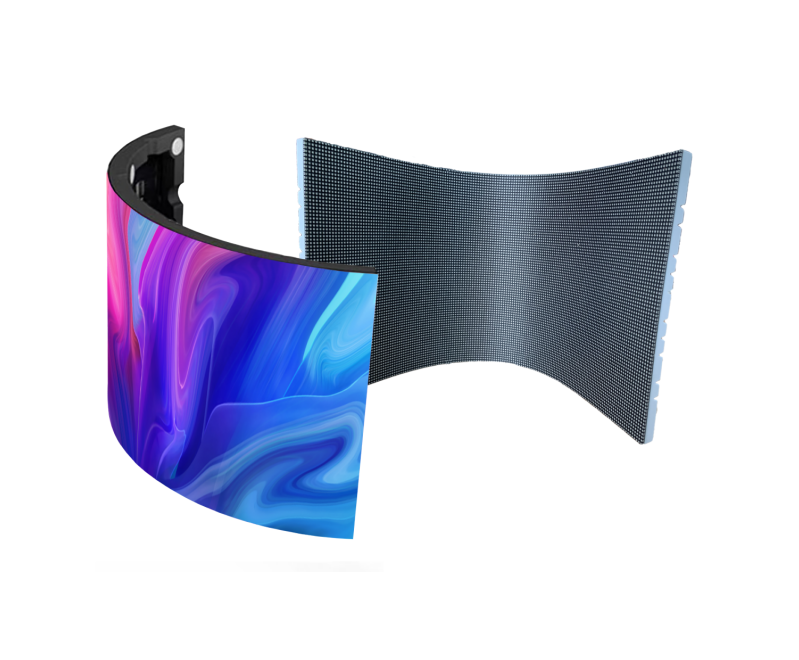
A soft LED module is a flexible LED display tile that can follow a designed curve when mounted on a shaped support frame. It is often called a flexible LED module or LED soft module. The flexible circuit and soft backing allow a column wrap, concave wall or wave to carry a continuous image where flat LED cabinets would form visible facets. The LEDs themselves do not stretch, and the completed screen still needs a rigid engineered structure, power, data and ventilation.
This guide explains how a soft LED module works, seven practical advantages, where it makes sense, and the limitations that are easy to miss in a product photograph. It also gives a selection process for pixel pitch, bend geometry, mounting, maintenance and content mapping. EagerLED’s EA-Flex specifications are used as a concrete example; confirm every final dimension and electrical value against the quotation and current model datasheet.
If your project is a standard flat video wall, a rigid LED cabinet may be simpler. If the architecture demands a true curve, begin with the measured finished surface and service plan before choosing a soft LED module. That order avoids ordering tiles that cannot fit the radius, land on the frame or be removed after installation.
Table of contents
- What is a soft LED module?
- How a soft LED module works
- Seven advantages of soft LED modules
- Soft LED module vs rigid LED module
- Where flexible LED modules work best
- How to choose a soft LED module
- Geometry, resolution and system calculations
- Installation and commissioning checklist
- Limitations and common mistakes
- Frequently asked questions
- Conclusion
1. What is a soft LED module?
A soft LED module is one replaceable display tile in a curved LED screen. A flexible printed circuit board carries the LED pixels and driver electronics; a soft protective mask and rear structure let the assembly conform to a specified curve. In many indoor systems, magnets hold the tile against a ferromagnetic support. Multiple tiles form the display surface, while receiving cards, power supplies and a controller make the image work.
The key distinction is controlled flexibility. The tile is designed for an allowed bend direction and limit. It is not a fabric sheet that can be folded, twisted or stretched into any three-dimensional form. A finished soft LED display depends on an accurately fabricated frame, consistent module orientation, suitable cabling and a planned service route. For a true compound or spherical surface, standard rectangular modules may still show seams; request a physical sample and engineered layout before promising a seamless result.
IPC identifies IPC-2223D as a sectional design standard for flexible printed boards. That confirms the circuit category, but it does not define the allowable radius of a particular LED product. The module maker’s current datasheet and a sample installation determine whether a proposed curve is feasible. On EagerLED’s EA-Flex product page, the listed module families include 240 × 120, 320 × 160, 256 × 128, 250 × 250 and 300 × 168.75 mm formats. Confirm availability for your selected pixel pitch.
2. How a soft LED module works
01. Flexible circuit and optical surface
The flexible circuit replaces the rigid board used in a conventional LED tile. Copper traces connect the LEDs, driver ICs and connectors while the assembly follows the intended bend. The mask keeps pixel spacing and protects the front of the tile. Even small changes in pixel spacing along a curve can become visible as bands, so product design and installation accuracy both matter. A soft LED module should be handled at its supported edges and kept within the manufacturer’s bend guidance during unpacking and service.
02. Frame, magnets and service access
A shaped steel or other approved ferromagnetic frame establishes the display radius. Magnets position the soft LED module on that surface; they do not compensate for incorrect frame geometry. Modules can often be removed from the front with a dedicated service tool. This is useful on a column, where a technician cannot stand behind the screen, but only if the power supplies, receiving cards and connections are also reachable. A thin front surface can still hide a deep and difficult-to-service system.
03. Power, signal and content mapping
Power and data enter through connectors on the back of each tile. Cable slack must allow the designed curve and a future module removal without putting tension on solder joints. The controller maps video pixels to the physical module grid. For a cylinder, content may wrap around a vertical seam; for a wave, the most important image may cross several viewing angles. Plan those content boundaries before finalizing the grid, and test the complete chain with the actual controller and media source.
3. Seven advantages of soft LED modules
01. A smoother architectural curve
Flat cabinets can be joined into a polygon, but their edges are apparent at close viewing distances. A soft LED module follows a continuous support, making a cylinder, inward curve or flowing wall appear more integrated with the architecture. The result depends on radius consistency, module size and sight line; a flexible tile alone cannot hide a poorly positioned seam.
02. More shape options within a stated limit
Designers can use flexible LED modules on retail pillars, circular features, stage waves and selected curved lobby walls. The phrase “any shape” should be treated cautiously. A single-axis bend is usually easier than a compound surface, and a sharp corner still needs another construction method. Confirm concave versus convex orientation and whether the chosen model supports both.
03. Lower tile weight and shallow face depth
A soft LED module omits the heavy individual housing found in many cabinet systems, which makes a replacement tile easier to handle. This can help with retrofit projects and curved scenic work. The complete installed load must still include the frame, power supplies, wiring, finishing materials and access hardware. A light tile is not evidence that the building attachment can be light.
04. Magnetic positioning on a prepared frame
Magnetic mounting can reduce individual fasteners and speed positioning. It also lets an installer adjust a tile during seam alignment. Magnet strength, surface flatness, frame material, vibration conditions and safety retention must be assessed together. On suspended or public-facing structures, follow the project engineer’s retention and access requirements.
05. Front replacement of a failed tile
A damaged soft LED module can often be exchanged from the viewing side without dismantling a full cabinet. This matters for wrapped columns and recesses with no rear corridor. Specify a service tool, spare tiles from the same calibration batch, reachable cable connectors and enough clearance to pull a module forward safely.
06. Fine-pitch choices for nearby audiences
Flexible modules are available in several pixel pitches. EagerLED lists fine-pitch EA-Flex options in its 240 × 120 mm family. A smaller pitch creates more pixels per square metre and can improve apparent detail for close viewers, but it increases pixel count, processor demand and usually cost. Select pitch from actual viewing distance, content and budget rather than a fixed “distance equals pitch” slogan.
07. Camera-facing potential when the full system is specified
EagerLED lists a refresh frequency of at least 3,840 Hz for a 240 × 120 mm EA-Flex parameter group. This may help on stage and on camera, but a headline refresh figure does not guarantee a clean recorded image. Driver settings, scan mode, brightness, frame rate, shutter angle, controller synchronization and calibration all affect banding and moiré. Test the exact screen and camera combination before a broadcast commitment.
4. Soft LED module vs rigid LED module
The best choice is based on geometry and lifetime access. Both technologies can deliver a high-quality image when correctly specified. The difference is how they mount and what tolerances the installation must control.
| Decision factor | Soft LED module | Rigid LED module or cabinet | Project implication |
|---|---|---|---|
| Best surface | Designed concave, convex or cylindrical curve | Flat wall or faceted shallow curve | Model the actual sight line before ordering |
| Substrate | Flexible printed circuit | Rigid printed circuit | Neither type should be forced beyond its design |
| Support | Precise shaped ferromagnetic frame | Standard cabinet rails or structure | Frame cost can outweigh bare tile savings |
| Typical service | Magnetic front access to tiles | Front or rear, model dependent | Check access to electronics as well as tiles |
| Installation complexity | Radius, seam and cable paths need close control | Grid and flatness need close control | Use an on-site mock-up for unusual shapes |
| Environment | Often indoor; verify exact IP rating | Indoor and outdoor product families | Do not infer weather protection from flexibility |
| Best purchase reason | Architecture genuinely requires a curved surface | Efficient standard wall or rental screen | Choose the simplest system that meets the brief |
A rigid cabinet can also form a curved wall using angled joints. For distant audiences, that may be fully acceptable and easier to service. A soft LED module is most valuable where a nearby audience would notice facets or where the desired shape cannot be built cleanly from standard cabinets.
5. Where flexible LED modules work best
01. Retail columns and public interiors
A column wrap turns an obstruction into a digital feature. Measure its finished circumference after cladding, not the structural core alone. Decide whether the vertical seam faces a wall or primary walkway. A full 360-degree image also needs enough horizontal pixels and a content layout that can wrap without an abrupt change at the seam. Keep fire, egress and public-contact requirements in the architectural review.
02. Curved showrooms, lobbies and museums
A broad concave wall can place more of an image in the viewer’s field of vision, while a convex wall can face several approach directions. In a museum, text readability and color accuracy may matter more than dramatic shape. For a lobby, ambient daylight can dictate brightness and content contrast. Ask for a mock-up at the planned viewing location; drawings rarely show how seams and pixel texture will actually appear.
03. Stages, exhibitions and camera sets
Wave forms and circular scenic pieces can make a background feel continuous. Touring and temporary uses add vibration, repeated handling and rapid service requirements. Confirm whether the selected soft LED module and frame are approved for repeated assembly, and document cable strain relief and safe access. For a camera set, test moiré, color, flicker and synchronization with the intended lenses, exposure and signal workflow.
04. When to choose another technology
A transparent LED screen is better when daylight and a view through glazing are central to the brief. A conventional indoor LED wall may be better for a flat rectangular space. An outdoor-rated cabinet is preferable for exposed weather unless a specifically outdoor-rated flexible system has been documented. A soft LED module solves a geometry problem; it does not automatically solve transparency, weather protection or structural load.
6. How to choose a soft LED module
Start with the information that can disqualify a module: finished geometry, environment and service. Then optimize pitch, brightness and electronics. The table below turns common marketing specifications into questions that a buyer can verify.
| Specification | What to request | Why it matters | Proof before order |
|---|---|---|---|
| Bend limit and direction | Minimum radius or allowed angle for exact model, inward and outward | Prevents damaged circuits and uneven seams | Datasheet plus physical sample on the proposed frame |
| Module format | Width, height, thickness, orientation and active pixels | Determines grid fit, edge treatment and resolution | Module drawing and pixel map |
| Pixel pitch | Pitch options for the same mechanical format | Changes close-view detail and total processor load | Sample at nearest normal viewing distance |
| Brightness and control | Calibrated brightness range, sensor and dimming behavior | Image must suit ambient light without glare | On-site or representative lighting test |
| Refresh and grayscale | Actual operating mode with chosen receiving card | Camera performance can differ from brochure maximum | Camera test at target settings |
| Protection and temperature | IP rating, operating range and ventilation requirements | Indoor products may fail in wet or dusty sites | Model datasheet and site assessment |
| Service design | Tool, spare plan, tile removal clearance, PSU and card access | A front-service tile is useful only in a serviceable system | Maintenance drawing and removal demonstration |
| Power and control | Maximum and typical power, circuit plan, controller capacity | Shapes still require reliable electrical engineering | Electrical schedule and system diagram |
When comparing proposals, ask whether all suppliers are quoting the same finished area, pixel count, spare percentage, control system, frame, shipping, commissioning and warranty. A cheap module-only quote is not comparable with a complete installed screen. EagerLED’s EA-Flex range provides model groups, but obtain the exact quotation sheet for your chosen configuration before approving a radius or budget.
7. Geometry, resolution and system calculations
01. Calculate a cylinder from finished dimensions
For a circular column, circumference is approximately π × finished diameter. Divide that circumference by the module’s width in the direction of wrapping to estimate the number of tiles around one ring. Then divide display height by module height for the number of rows. This produces a planning count, not an installation drawing: a non-integer count means the diameter, seam gap, module orientation or cladding must change. Do not stretch the last soft LED module to close a mismatch.
For example, a 1,000 mm finished diameter gives a circumference of about 3,142 mm. If the proposed tile is 240 mm wide in the wrap direction, 3,142 ÷ 240 is about 13.1 tiles. Thirteen tiles cover 3,120 mm before seam allowance; engineering must determine whether the 22 mm difference is acceptable in the final frame and content seam. The arithmetic does not prove that the bend radius is safe. Confirm it separately against the exact module model.
02. Calculate pixels and content canvas
Physical pixels across a surface equal the sum of the active pixel columns of the installed modules. For a uniform grid, columns around × pixel columns per tile gives horizontal pixels; rows high × pixel rows per tile gives vertical pixels. The controller must support that total and the chosen mapping. The native pixel canvas matters for media production, especially on a full cylinder where a single panoramic asset may be used. Ask the supplier for the final pixel map before an agency creates animation.
03. Allow for electrical and mechanical margins
Use the manufacturer’s maximum power figure for circuit sizing and thermal design, while typical power can inform operating-cost estimates. The connected load also includes receiving cards, controllers and other equipment. The steel frame must be sized for full dead load, anchoring, local code requirements and service forces, not for tile weight alone. On a public column, protect accessible edges and cables and document who can safely isolate power before maintenance.
| Planning input | Simple calculation | Common mistake | Required check |
|---|---|---|---|
| Column circumference | π × finished diameter | Using concrete core diameter | Measure after final cladding allowance |
| Module count per ring | Circumference ÷ module wrap width | Rounding without a seam plan | Approve fabrication drawing and sample |
| Total active pixels | Installed tile grid × pixels per tile | Assuming video aspect ratio matches screen shape | Controller and content pixel map |
| Electrical load | Model-specific maximum watts × tile count, plus system loads | Sizing only from typical watts | Engineer circuit and protection plan |
| Installed mass | Modules + frame + electronics + cables + finish | Quoting bare module weight as total | Structural sign-off |
8. Installation and commissioning checklist
01. Verify the frame before opening every tile
Check the approved shop drawing against the finished site: radius, diameter, level, plumb, module grid, magnet contact surface, ventilation and reachable service zones. For a column, trace the vertical seam and inspect how cable trunks reach the power and data distribution point. A flexible module follows the frame, so a protrusion or inconsistent weld can show through as a visible step. Test one representative section before a full installation.
02. Mount, cable and map in a repeatable sequence
Label each soft LED module by planned position and orientation. Fit tiles without over-bending, then connect power and data with controlled slack. Keep cables away from sharp metal, heat sources and locations where front removal would pull on a connector. Bring up one section at a time to isolate faults. Record receiving-card files, controller settings and final wiring diagram so future service does not depend on one installer’s memory.
03. Inspect under real content and light
Run solid colors, gradients, fine text and motion before commissioning. Look for dead pixels, brightness bands, poor seams, color mismatch and moiré at the nearest normal viewing point. Test the content wrap at the column seam and inspect the screen from every intended approach. If cameras will record the display, test at the actual camera frame rate and shutter settings. Save final calibration, mapping and spare-module information with the handover documents.
Removal deserves its own demonstration. A technician should be able to take out a representative middle tile using the specified tool without damaging adjacent pixels or pulling stressed cables. Repeat the test after surrounding trim is complete; access that works on a bare frame may disappear when architecture is closed.
9. Limitations and common mistakes
A soft LED module offers design freedom, but every benefit has a boundary. The most costly mistakes are made before the tiles arrive: ordering from a conceptual diameter, choosing a pitch without viewing tests, overlooking power-supply access and assuming an indoor rating is weatherproof.
- Do not exceed the approved bend. A soft backing does not make solder joints, connectors or LEDs foldable. Avoid creasing, twisting and unsupported sharp corners.
- Do not expect magnets to straighten a poor frame. Uneven radius, welds or attachment height can create visible steps and gaps. Fix the structure rather than forcing a soft LED module into alignment.
- Do not ignore environment. EagerLED’s reviewed EA-Flex parameter groups identify indoor IP31 products. A different outdoor system needs its own documented rating and enclosure design.
- Do not compare only tile prices. The frame, receiving hardware, electrical work, controller, commissioning, transport and spares belong in total cost.
- Do not promise camera performance from refresh alone. Verify the complete control chain in the real shooting setup.
- Do not hide the service path. Front tile access will not help if a power supply or hub can only be reached by removing permanent architectural finishes.
For a standard flat wall, consider a conventional indoor LED display. For a curved installation, request a documented radius, module orientation and service drawing. That small design effort is far cheaper than replacing a large number of stressed modules after handover.
10. Frequently asked questions
01. What is a soft LED module?
A soft LED module is a replaceable flexible LED display tile built around a flexible printed circuit and soft protective structure. It follows a designed curve on a supporting frame; it does not create a stable screen shape by itself.
02. Is a soft LED module the same as a flexible LED module?
Usually yes. Suppliers use “soft LED module,” “LED soft module” and “flexible LED module” for the same general product category. Compare the exact model's pitch, format, bend limit and environmental rating before buying.
03. What is the minimum bend radius?
There is no universal minimum for all soft LED modules. It depends on the exact module design, bend direction and mounting method. Ask for the current model datasheet and test a representative section on the intended frame.
04. Can soft LED modules wrap a complete column?
Yes, when the finished diameter is within the chosen model's approved bend limit and its module widths can close around the circumference with an engineered seam. Plan the vertical seam, cable route, pixel map and front service before fabrication.
05. Are soft LED modules waterproof?
Only if the specific product and completed system have a documented outdoor protection rating. The EA-Flex parameter groups reviewed for this guide are indoor IP31 products and should not be treated as rainproof.
06. What pixel pitch should I choose?
Choose a pitch from the closest normal viewing distance, type of content, camera requirements and budget. Evaluate a sample under realistic lighting rather than using a single universal distance rule.
07. How are soft LED modules maintained?
Many systems use magnetic front removal, but the technician also needs safe access to connectors, receiving cards and power supplies. Include the removal tool, spares and final wiring map in the handover package.
08. What information should I send for a quotation?
Send finished width, height, diameter or radius, curve direction, drawings, site photos, viewing distance, indoor or outdoor conditions, mounting details, service access, content source and installation schedule. Ask for a complete system quote with frame, control and spares.
11. Conclusion: specify the curve before the module
The best soft LED module is the one that safely fits the finished geometry, looks right from the intended viewing positions and can be serviced throughout its life. Its seven advantages—smooth curves, design freedom, low tile weight, magnetic positioning, front replacement, fine-pitch options and camera-facing potential—are useful only when the frame, bend limit, electronics and content plan are equally sound.
For a project-specific recommendation, send EagerLED your finished dimensions, radius, viewing distance and site conditions. Review the EA-Flex soft LED module specifications and request a module layout, pixel map, frame proposal and complete bill of materials before committing to fabrication.