

A white spot on a screen is usually a hardware symptom, not dirt and not an app bug. The safe fix depends on what the spot actually is: a single stuck pixel may respond to a pixel-refresh test, while a soft pressure mark, failed backlight lens, or damaged display layer normally requires professional repair or panel replacement.
The most important rule is simple: do not press, rub, tap, or twist the panel. Those popular “fixes” can turn one small bright patch into permanent screen damage. Use the tests below to identify the fault first, then choose the least invasive repair that matches it.
Quick answer: Take a screenshot, view it on a second device, clean the powered-off display gently, and test full-screen black, white, gray, red, green, and blue images. If the mark appears in the screenshot on the second device, investigate the source, app, or graphics system. If the screenshot is clean but the spot stays fixed on the physical screen, the fault is downstream: the cable, display electronics, backlight, or panel.
Table of Contents
- 1. What Do White Spots on a Screen Usually Mean?
- 2. Diagnose the White Spot in 10 Minutes
- 3. How to Fix White Spots on a Screen Safely
- 4. How to Fix a White Spot on an LCD Monitor or Laptop
- 5. How to Fix White Spots on a TV Screen
- 6. How to Fix White Spots on a Phone or Tablet
- 7. How to Fix White Spots on an LED Display
- 8. Should You Repair or Replace the Screen?
- 9. How to Prevent White Spots From Returning
- 10. Frequently Asked Questions
- 11. Final Verdict
1. What Do White Spots on a Screen Usually Mean?
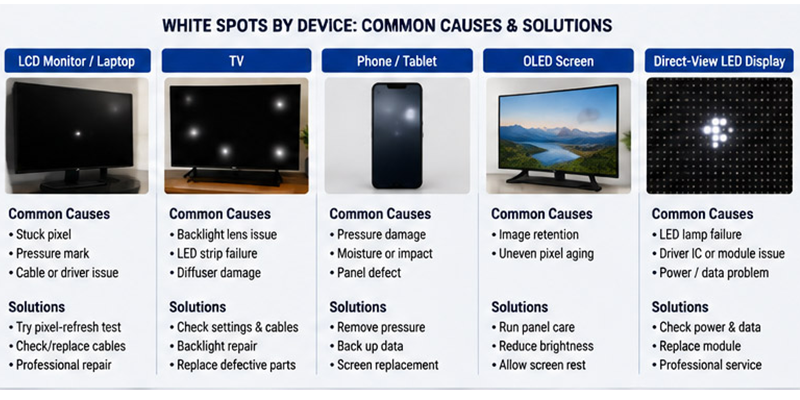
“White spot” is a description, not a diagnosis. It can refer to a bright pixel no larger than a pinprick, a cloudy pressure mark several centimeters wide, a circular TV backlight hotspot, or uneven brightness on an OLED panel.
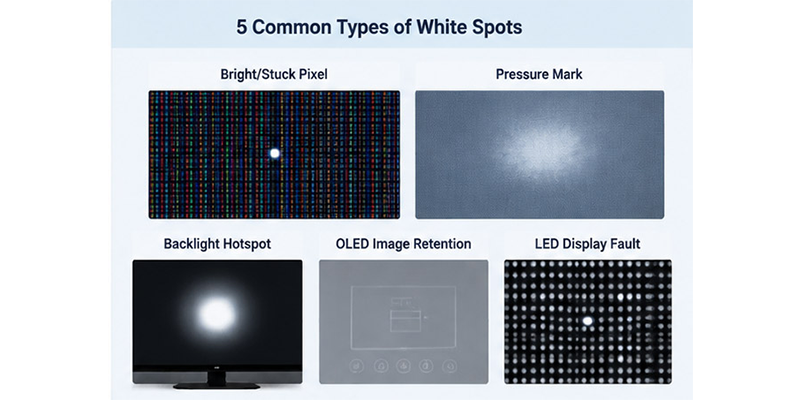
That distinction matters because these defects occur in different parts of the display. Dell’s current display pixel guidelines explain that a pixel contains red, green, and blue subpixels: all three are illuminated to produce white. A permanently bright pixel can therefore appear as a tiny white dot, while a stuck subpixel is more likely to appear red, green, or blue.
| What you see | Most visible on | Likely cause | Can software fix it? |
|---|---|---|---|
| One sharp white or colored dot | Black and solid-color screens | Bright or stuck pixel/subpixel | Sometimes, but never guaranteed |
| Soft, cloudy patch | White or light-gray screens | Pressure damage, distorted diffuser layer, or trapped debris | No |
| Bright circle or several “flashlight” spots | Dark TV scenes | Loose backlight lens, damaged LED strip, or diffuser fault | No |
| Faint retained shape or uneven patch on OLED | Gray test screen or after static content | Temporary image retention or uneven pixel aging | Panel care may help retention, not permanent wear |
| Spot visible in a screenshot viewed elsewhere | The screenshot itself | App, content, operating system, or rendered graphics issue | Often |
| Crisp bright dot or cluster on an LED video wall | Every test pattern | LED lamp, driver IC, module, power, or data fault | No |
Dead pixels are different. A fully dead pixel usually stays black. A bright pixel stays illuminated. A larger white patch is rarely a single pixel problem, even when a seller or forum post uses “dead pixel” as a catch-all term.
2. Diagnose the White Spot in 10 Minutes
Do these checks in order. Stop as soon as the evidence points to physical damage, a lifting phone display, or an internal electrical fault.
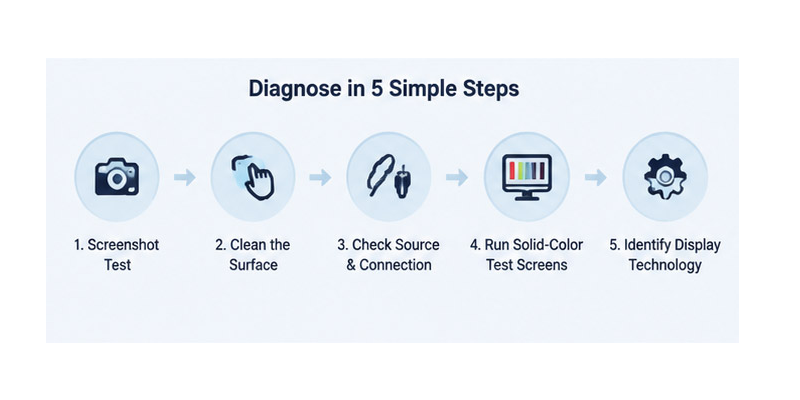
2.1 Use the Screenshot Test
Take a screenshot while the spot is visible, then open that file on another screen.
- The spot is present in the screenshot: the problem is in the image, app, browser, operating system, or graphics rendering path.
- The screenshot looks clean: the fault occurs after the screenshot is captured. Continue testing the cable, port, display electronics, backlight, and panel.
A clean screenshot does not prove the LCD panel alone is defective. A damaged cable, unstable port, or monitor control board can also affect the final image, so continue with the input test.
2.2 Clean the Surface Without Pressure
Turn the device off and unplug it. Use a clean, soft, lint-free cloth. Follow the manufacturer’s instructions for your exact product, and apply any approved liquid to the cloth rather than directly to the display.
Apple’s product cleaning guidance advises users to avoid abrasive materials, excessive wiping, moisture in openings, and cleaners sprayed directly onto a device. If the mark changes with viewing angle or disappears after gentle cleaning, it was probably residue rather than an internal white spot.
2.3 Isolate the Source and Connection
For a monitor or TV, display the built-in settings menu. Then disconnect external video sources and try another known-good cable and input.
- If the spot appears over the device’s own menu, the external source is not the cause.
- If it disappears with a new cable, port, or source, the panel may be fine.
- If the defect flickers, forms blocks, or moves, suspect signal or electronics before a fixed pressure mark.
2.4 Run Solid-Color Test Screens
At normal brightness, inspect full-screen black, white, 50% gray, red, green, and blue images from a normal viewing distance. Do not run the display at maximum brightness just to exaggerate the defect.
Record which backgrounds reveal the spot, whether its edges are sharp or soft, and whether it stays in the same physical position. Take one straight-on photo that includes the entire screen. This gives a repair shop or warranty team more useful evidence than a close-up with no context.
2.5 Identify the Display Technology
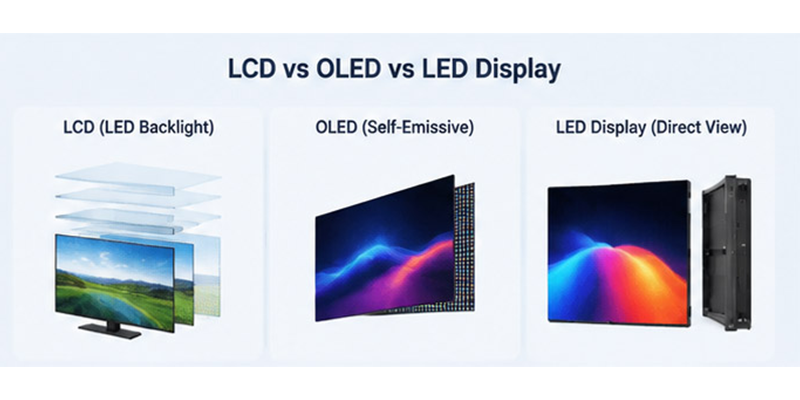
An “LED TV” is usually an LCD panel with an LED backlight. It still has diffuser films and backlight components. An OLED has self-emissive pixels and no separate backlight. A direct-view LED display uses visible RGB LEDs arranged in replaceable modules. The same-looking white mark needs a different repair on each system.
3. How to Fix White Spots on a Screen Safely
Start with reversible actions. If they do not match the diagnosed fault, skip them rather than repeating them.
3.1 Reset the Image Path
Restart the device, restore a neutral picture mode, disable extreme contrast or local-dimming settings temporarily, and test another input. This can remove a processing artifact, but it will not repair a spot that stays fixed over the built-in menu and every test color.
3.2 Try One Controlled Pixel-Refresh Test
Use a reputable full-screen color-cycling test for a single sharp stuck pixel, or use the panel-care function built into the device. Run it for the time recommended by the manufacturer, then reassess.
Do not confuse a stuck-pixel test with a cure for pressure damage. It cannot realign diffuser films, reattach a TV backlight lens, or repair cracked panel layers. Avoid rapid-flashing tools if you are photosensitive.
3.3 Use the OLED Manufacturer’s Panel-Care Feature
If an OLED shows temporary retention after a static logo, menu, scoreboard, or game interface, turn it off normally and allow its automatic compensation cycle to run. Sony’s OLED guidance, updated in January 2026, describes panel refresh, panel calibration, pixel shift, screen savers, and automatic brightness controls as protection against image retention.
Run manual refresh only as directed for the specific model. Repeating a deep refresh is not a general maintenance routine, and it cannot reverse permanent uneven aging.
3.4 Remove Pressure Around the Display
Remove a tight case, keyboard cover, stacked object, or mounting stress that may be pressing on the device. Do not push the white spot from the front or massage the panel. Once the optical layers are deformed, front pressure is more likely to spread the damage than fix it.
3.5 Use Warranty or Professional Service
Choose service when the mark is a soft patch, a round TV hotspot, a growing cluster, or any defect linked to impact, liquid, internal dust, overheating, or lifting glass. Pixel warranty thresholds vary by manufacturer, model, region, and defect type, so check the exact policy before opening the product. Disassembly can void coverage and can damage a thin panel beyond repair.
4. How to Fix a White Spot on an LCD Monitor or Laptop
For an LCD monitor or laptop, the most common look-alikes are a bright pixel and a pressure/diffuser mark.
- Run the screenshot and solid-color tests.
- Check whether the lid has been compressed by a bag, stacked books, a webcam cover, or an object left between the keyboard and screen.
- Test the computer with an external monitor. A clean external image supports a fault in the laptop display assembly or its cable rather than the rendered image.
- If the defect is one sharp dot, try one controlled pixel test and review the manufacturer’s pixel policy.
- If it is a fuzzy patch, stop DIY pressure tricks. Request warranty service or a display-assembly quote.
A laptop panel is normally replaced as an assembly. Opening the LCD stack to clean or reposition its films is rarely economical outside a properly equipped repair environment; one speck of dust or crease can remain visible after reassembly.
5. How to Fix White Spots on a TV Screen
First determine whether the TV is LCD/LED-backlit or OLED.
On an LCD or LED-backlit TV, one or more bright circles often indicate a backlight LED lens or diffuser problem. Settings can make the spots less obvious, but they cannot reattach a loose lens or correct a warped optical sheet. Backlight service requires removing a large, fragile panel, so it is a technician-level repair unless the person already has the proper workspace, tools, and model-specific service experience.
On an OLED TV, use the built-in panel-care process and remove persistent static content. Sony specifically lists static images, game interfaces, menus, channel logos, news tickers, and repeated letterbox areas as image-retention risks. If the pattern remains after the manufacturer’s normal care cycle and ordinary mixed viewing, request service.
Before booking a repair, photograph the TV on black, gray, and white screens, note the model and serial number, and check whether the spot appears over the TV’s own home menu. That evidence helps distinguish panel or backlight failure from an HDMI source problem.
6. How to Fix White Spots on a Phone or Tablet
Phone and tablet displays are laminated, so a localized white patch after a drop, bend, or sustained pressure usually requires a complete display replacement. A software reset will not repair damaged optical layers.
Remove a tight case and check whether the display is lifting from the frame. If the screen is separating, the device is unusually hot, or the chassis looks swollen, stop charging and using it and arrange professional service. Do not press the screen back into place; a swelling battery is a safety issue, not a display-adjustment problem.
For an OLED phone with faint temporary retention, use mixed content at moderate brightness and the manufacturer’s normal display protections. Persistent shapes or uneven brightness may reflect permanent pixel aging.
7. How to Fix White Spots on an LED Display
A direct-view LED display produces its image with red, green, and blue LEDs mounted on serviceable modules. Unlike an LCD, it has no backlight diffuser stack. A white spot therefore usually points to a pixel, driver, power, signal, or calibration fault.
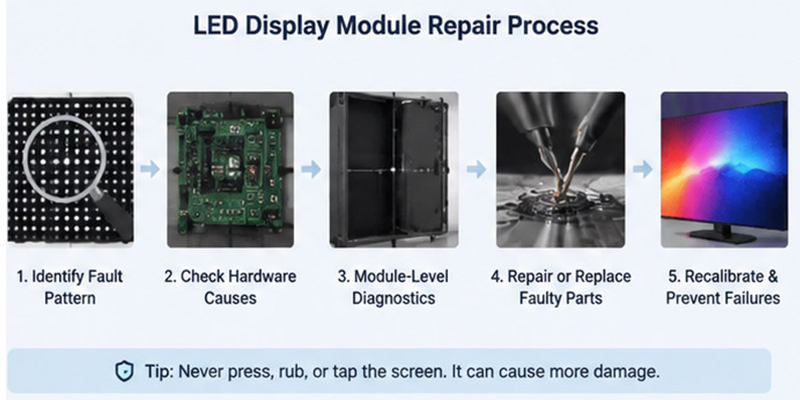
Begin at module level. Replacing a lamp without confirming the cause may leave a new color or brightness mismatch.
7.1 Identify the LED Display Fault Pattern
Run red, green, blue, white, black, and mid-gray test patterns.
| LED display symptom | Most likely fault area | First check |
|---|---|---|
| One sharp white pixel | LED package or driver output | RGB channel behavior on every test color |
| Small fixed cluster | Driver IC, PCB, or local power path | Module swap and solder inspection |
| Row or column of bright pixels | Driver channel or data connection | Ribbon cable, hub board, and driver output |
| Whole module is brighter | Calibration data or power variation | Module settings, voltage, and correction coefficients |
| Fault flickers or moves | Signal or power instability | Data chain, receiving card, connectors, and power supply |
Photograph the full display and note the cabinet, module, and pixel coordinates. This record helps technicians relocate an intermittent fault after shutdown.
7.2 Check the Most Likely Hardware Causes
The pattern narrows the repair area but does not identify the component by itself. Common causes include:
- LED lamp failure: a short or damaged RGB channel can leave a pixel too bright or create a white-looking color mix.
- Driver IC failure: unstable current can hold a pixel, row, or local group at abnormal brightness.
- PCB or solder damage: cracked joints, shorts, or contamination can interrupt the intended current path.
- Power variation: a weak supply or poor connector can make a module brighter or unstable.
- Data faults: ribbon cables, hub boards, receiving cards, and connectors can create blocks, lines, or flicker.
- Calibration mismatch: a healthy replacement module can still appear brighter than older modules.
7.3 Follow a Module-Level Diagnostic Process
Only trained personnel should service LED hardware. Power down the cabinet and follow the manufacturer’s isolation procedure before touching modules or connectors.
- Confirm that the spot stays at the same position on every test pattern.
- Inspect ribbon cables, connectors, receiving-card status, power terminals, and visible PCB damage.
- Measure the relevant power rail against the manufacturer’s specification.
- Swap the suspect module with a known-good unit of the same model, pixel pitch, scan mode, and configuration.
- If the fault follows the module, inspect its LEDs, driver ICs, traces, and solder joints. If it stays in the cabinet position, test the hub board, receiving card, data cable, and power distribution.
7.4 Repair the Fault Without Creating a New Mismatch
Match the repair to the confirmed cause:
- Replace a failed LED only with a compatible part and controlled rework process.
- Repair driver, PCB, or solder faults when the module remains serviceable.
- Replace unstable power or data components before fitting another module.
- Use professional LED module repair when bench testing, rework, or matched spares are unavailable on site.
Repeat every test pattern after repair. Check flicker, color channels, temperature, and module uniformity before returning the display to service.
7.5 Recalibrate and Prevent Repeat Failures
A functional module can still form a bright square. Load the correct receiving-card configuration, restore correction data, and match brightness and white balance to adjacent modules. Confirm the result from the normal audience distance.
Prevent repeat failures with clear vents, controlled cabinet temperature, inspected connectors, dry storage, matched spare modules, and an LED display maintenance log containing the fault coordinate, repair, and calibration file.
7.6 Decide Between Repair, Replacement, and Rental
Repair an isolated fault when compatible parts are available. Replace the module when its PCB is damaged, several pixels have failed, previous rework is unreliable, or labor exceeds the module’s value. For recurring cabinet faults, compare continued repairs with current LED display products that offer stronger service and spare-parts support.
For a time-critical event, a last-minute repair can create more risk than it removes. A tested rental LED screen keeps the show on schedule while the original modules receive bench diagnosis.
Need a reliable next step? Compare serviceable LED display products, review EagerLED’s LED module repair guidance, or explore a rental LED screen for a deadline-critical project.
8. Should You Repair or Replace the Screen?
Use total cost, expected image quality, warranty status, and repair risk rather than the size of the spot alone.
| Situation | Best first decision |
|---|---|
| New device under warranty | Document the defect and file a claim before attempting repair |
| One stuck pixel outside warranty | Try one safe pixel test; tolerate it or compare repair cost with replacement |
| Small stable pressure mark near an edge | Monitor it if usable; replace the panel if it affects work or viewing |
| Large central LCD patch or cracked layer | Replace the panel or device |
| Several circular hotspots on an LCD TV | Quote professional backlight/diffuser service |
| Persistent OLED non-uniformity | Use model-approved panel care once, then request service |
| Faulty direct-view LED module | Repair or replace the module and recalibrate it |
| Repair quote approaches the price of an equivalent device | Replace unless the product has unusual value or serviceability |
Replacement is usually the more predictable outcome when white areas are multiplying, the panel has impact damage, the phone display is lifting, or a previous repair left uneven diffusion. A technically repairable screen is not always an economically sensible repair.
9. How to Prevent White Spots From Returning
- Avoid panel pressure. Carry laptops in a rigid, correctly sized compartment and keep objects away from the closed keyboard deck.
- Clean lightly. Power off first, use a lint-free cloth, and follow the product manual. Never spray the panel directly.
- Control heat. Keep vents clear and do not leave devices in hot vehicles or enclosed cabinets.
- Use sensible brightness. Maximum brightness accelerates heat and wear without improving most indoor viewing.
- Protect OLED screens from static content. Leave pixel shift, screen savers, and automatic panel-care features enabled.
- Handle TVs by the chassis. Do not lift, carry, or mount a television by pressing on the display surface.
- Maintain LED walls. Keep spare matched modules, log recurring pixel coordinates, inspect ventilation, and recalibrate replaced modules.
10. Frequently Asked Questions
10.1 Can a White Spot on a Screen Go Away by Itself?
Surface residue and temporary OLED image retention can disappear. A fixed bright pixel, pressure mark, damaged diffuser, loose backlight lens, or cracked panel layer usually will not heal on its own.
10.2 Is a White Spot the Same as a Dead Pixel?
No. A dead pixel normally stays dark. A bright pixel can appear white when all three subpixels remain illuminated. A soft white patch is usually larger than one pixel and points to an optical-layer or backlight problem.
10.3 Can I Fix a White Spot by Pressing or Rubbing the Screen?
Do not try it. Pressure can damage liquid-crystal layers, crease diffuser films, spread an existing mark, or crack the panel. Use non-contact tests and professional service instead.
10.4 Can Software Fix White Spots on a Screen?
Software may help a stuck pixel, a temporary rendering problem, or short-term OLED retention. It cannot fix pressure damage, internal dust, a detached backlight lens, a failed LED strip, or physical panel damage.
10.5 Can White Spots on a TV Be Fixed Without Opening It?
You can rule out settings, inputs, surface residue, and temporary OLED retention without opening the TV. Internal LCD backlight or diffuser faults require service access. Opening a large TV panel without the proper equipment has a high risk of cracking it.
11. Final Verdict
To fix white spots on a screen, diagnose the shape and layer before attempting a repair. A sharp dot may justify a single pixel-refresh test. A clean screenshot plus a fixed cloudy patch points toward the physical display. Round TV hotspots suggest backlight service, while an OLED needs its own manufacturer-approved panel-care path.
If the defect is structural, pressing the screen is not a shortcut. Document it, protect the warranty, and compare a professional repair quote with panel or device replacement. LED display owners can compare replacement display options, review module-level repair, or use a rental LED screen when uptime cannot wait. That is the safest route to a lasting fix.