

A right-angle LED display joins two LED screen faces at a 90-degree corner, allowing an image to continue around a wall, column, or exhibition feature. A successful system needs compatible corner hardware, an accurate pixel map, and service access on both faces. Its cost includes the display, controls, supporting structure, installation, and ongoing operation.
For AV integrators preparing a quotation, the main task is to turn an architectural concept into a buildable specification. A narrow seam, suitable resolution, and a realistic maintenance plan matter more than a rendering that looks impressive from one position.
This guide explains the design choices, budget boundaries, and supplier checks needed before ordering. Product examples illustrate available approaches; calculations are explicitly hypothetical and are not EagerLED quotations.
1. What Makes a Right-Angle LED Display Work?
The defining feature is the physical change of direction between two display faces. An outside corner wraps around a projecting edge; an inside corner follows a recessed junction. Specify which arrangement the project needs because a cabinet approved for one geometry is not automatically suitable for the other.
A right-angle LED display differs from a smoothly curved wall. The former makes a distinct turn, while the latter follows a radius using compatible curved cabinets or flexible modules. A supplier should provide a plan view showing the actual emitting surfaces, cabinet depth, and corner joint, rather than relying on the label “L-shaped.”

“Seamless” describes a design objective, not a promise that every viewer will see an invisible joint. Edge geometry, module alignment, surrounding light, image content, and viewing position all affect the result. Request a corner sample and inspect it from the nearest intended audience position and from each approach route.
A right-angle LED display can carry ordinary signage or specially produced perspective content. The corner alone does not generate a naked-eye 3D illusion. That effect also depends on animation designed around the screen geometry and a planned viewing area. For a retail corner with traffic approaching from both sides, readable independent messages may be more useful than one perspective illusion.
Define success before selecting hardware: continuous branding around an edge, two independently useful faces, or a perspective animation viewed from a designated location. These goals lead to different content layouts and acceptance tests.
2. Choose the Corner Hardware
01. Beveled cabinets and dedicated corner units
A common right-angle LED display approach uses purpose-built beveled cabinet edges. For example, the EagerLED EA500H8V rental screen uses 45-degree edges for 90-degree corner assemblies. Its cabinets measure 500 × 500 mm (19.7 × 19.7 in), with front and rear service access. Confirm the selected variant and connection details for the proposed build.

A dedicated corner unit is another option. The EA250H8 corner rental cabinet has a 250 × 500 mm (9.8 × 19.7 in) format and specified compatibility with selected EagerLED rental families. Ask for a drawing of the corner profile: a dedicated transition may look different from two flat faces meeting at a sharp edge.
Do not assume that a curve lock can produce a sharp right angle. Its approved adjustment range and the cabinet edge construction determine the available geometry. Cutting a standard cabinet on site also needs explicit engineering approval; it can alter module support, fasteners, sealing, and service access.

02. Fixed installation versus repeat assembly
For a permanent indoor right-angle LED display, the EA250WH5 indoor wall system provides a relevant reference: the published design supports right-angle configurations, front service, and a 30 mm (1.18 in) cabinet depth. Installed depth still includes the mounting arrangement, connections, and project clearances.
| Approach | Useful when | Evidence to request |
|---|---|---|
| Fixed indoor corner system | The screen remains in a lobby, store, or showroom. | Recess drawing, mounting details, and removal paths for corner components. |
| Beveled rental cabinets | The wall must be assembled, transported, and rebuilt. | Approved corner connection, packing protection, and repeat-assembly demonstration. |
| Dedicated corner cabinet | A mixed-format system needs a defined transition piece. | Actual corner profile and compatibility list for the exact cabinet revisions. |
| Outdoor corner assembly | Both faces are exposed to weather and changing daylight. | Front/rear protection ratings, drainage details, and site-specific structural design. |
The right-angle LED display specification should name the complete configuration, including corner parts and ordinary flat cabinets. A shared brand or matching pitch does not establish compatibility between different generations of hardware.
3. Size the Faces and Select Pixel Pitch
Measure each face independently. Record its active width, active height, orientation, and distance from surrounding architectural features. For a right-angle LED display, distinguish the LED surface dimensions from the building dimensions: trim, mounting offsets, and the corner detail can change the available screen area.
Then round the proposed dimensions to the supplier’s actual module and cabinet grid. Ask for a cabinet schedule that identifies left face, right face, and any dedicated corner units. This prevents a quotation from including enough square meters but the wrong combination of parts.
01. A worked area and pixel example
Assume two flat faces, each 3 m wide and 2 m high (9.8 × 6.6 ft), meeting at one corner. Their combined active area is 12 m² (about 129 ft²). With hypothetical 500 × 500 mm cabinets, each face uses six columns and four rows: 24 cabinets per face, or 48 total. A dedicated transition unit would change that schedule.
At an exact 2.5 mm pitch, each hypothetical face contains 1,200 × 800 pixels. Placing the faces side by side in one unwrapped content canvas gives 2,400 × 800 pixels, or 1.92 million pixels. Confirm the real module resolution and controller mapping before treating this calculation as a purchase specification.
This example shows why a right-angle LED display should be described by face dimensions and native pixels. A general “4K capable” claim may describe an input signal without telling you the installed display resolution.
02. Choose pitch from the content test
Start with the closest viewer who must read the content, then test representative text, logos, and images at native resolution. Smaller pitch gives more pixels within a fixed area, but it cannot correct text placed across an awkward corner or content designed for the wrong aspect ratio.
For a right-angle LED display, inspect both faces at their real viewing angles. One face may look nearly frontal while the other is strongly oblique. Agree on readable text sizes and acceptable color consistency at named viewing positions instead of treating a single viewing-angle specification as a complete guarantee.
4. Plan Installation and Service Access
Approve the service path before closing the wall or column. A front-service label is useful only when the technician can reach and remove every required component. At a right-angle LED display joint, the neighboring face or decorative trim may obstruct a suction tool, module movement, or a technician’s hands.

Request a demonstration of removing the module closest to the corner, followed by access to the power supply and control components behind it. Include the space needed to disconnect cables and reinstall parts. Record whether an adjacent module must come out first and whether this is practical at the installed height.
The EA250WH5 product documentation describes direct HUB module connections. This illustrates why replacement planning must cover the internal interface as well as the visible module size. Keep the exact module, HUB board, receiving-card configuration, and power-supply references in the handover record.
An outdoor right-angle LED display also needs a complete weather-protection plan. Ask which surfaces and connections are covered by the stated rating, how water drains at the corner, and how the assembly is sealed after servicing. Do not apply an indoor cabinet’s specifications to an outdoor version with a similar name.
Both faces need coordinated structural support, cable routing, and heat management. Qualified project personnel should confirm loads, attachment methods, electrical distribution, and local requirements. Cabinet depth alone does not determine ventilation clearance or the final installation depth.

Use a measured site package to resolve these questions before fabrication. The LED display site survey checklist provides a starting point; add corner sections, photographs of each approach, and marked maintenance routes for this application.
5. Map Content Across the Corner
Decide whether the right-angle LED display will show one continuous canvas, two independent messages, or both. Identify the pixel coordinate where one face ends and the other begins. Give the content team the final pixel map, orientation, physical face dimensions, and a clearly marked corner boundary.
For ordinary advertising, keep essential text and QR codes fully on a face that the intended viewer can see. A logo crossing the corner may appear divided from some positions, even when the pixel mapping is correct. Test actual campaign artwork instead of relying only on a full-screen landscape video.
For perspective animation, agree on the viewing position before commissioning creative work. Supply the screen’s geometry and elevation so the animation can be rendered for that location. A right-angle LED display does not guarantee the same apparent depth from every point in a public space.
The playback system must support the selected canvas and operating mode. Ask the integrator to document input resolution, scaling, output mapping, and synchronization across faces. Check model-specific output limits and receiving-card loads; total pixel capacity alone may not describe every configuration limit.
During commissioning, move a test line across the corner and inspect timing and alignment. Then run the intended content at the planned brightness. If cameras will record the screen, include the actual frame rates and shutter settings in the test. An advertised refresh rate by itself does not guarantee clean recordings under every camera setup.
6. Build a Complete Project Budget
A right-angle LED display has no single reliable price per square meter without a defined configuration. EagerLED’s EA250WH5 page directs buyers to project quotations based on the selected screen and accessories. Obtain a dated, itemized offer in your purchasing currency and compare the same delivery and installation scope.
The main hardware variables include active area, pixel pitch, cabinet family, corner construction, environmental requirements, and spare parts. Smaller pitch increases pixel count for the same area, but the price difference must come from the actual quotations. Do not assume that the complete project price changes in direct proportion to pixel count.
| Budget line | Define in the request | Common comparison gap |
|---|---|---|
| Display hardware | Cabinet quantities, corner parts, exact pitch, and selected versions. | One offer includes only standard flat cabinets. |
| Control and distribution | Processor, player, signal links, power distribution, and configuration. | A controller is included but commissioning is excluded. |
| Structure and installation | Frame, attachments, engineering, access equipment, labor, and finishing. | The screen price excludes the building-side work. |
| Delivery and receiving | Packing, freight, insurance, delivery point, taxes, and unloading responsibility. | Quotes use different delivery terms or destinations. |
| Content and operation | Artwork adaptation, animation, licenses, training, and service arrangements. | A visual concept is mistaken for delivered playable content. |
| Spares and future service | Compatible modules, electronics, tools, storage, and replacement support. | Only ordinary modules are supplied for a special corner assembly. |
For a right-angle LED display, compare the corner premium separately from the rest of the wall. Ask suppliers to distinguish standard-face hardware from special parts and additional labor. A percentage premium is meaningful only when both offers share the same baseline configuration and exclusions.
Operating cost needs a separate calculation. For illustration only, assume a complete screen averages 2 kW during its actual content schedule and runs 10 hours daily for 30 days. Consumption would be 600 kWh for that period. Multiply by the site’s electricity tariff; add cooling or other equipment only if it is outside the measured load. These assumptions are not product specifications.
Use measured or supported average consumption for energy budgeting and the appropriate maximum-load information for electrical design. Ask how brightness, content, operating hours, and standby behavior affect the estimate. Avoid turning a maximum-power specification into an assumed daily average.
7. Compare Suppliers and Approve the Screen
Issue the same requirement package to each supplier. Include the two face dimensions, corner orientation, viewing positions, environment, service route, content mode, and delivery destination. Require an exceptions list so a lower-priced right-angle LED display offer cannot silently substitute a different pitch or omit the corner hardware.
Before placing the order, request a representative assembled corner. Review uniform gray, white, and primary-color fields, fine alignment patterns, and normal campaign content. Inspect the joint with the screen both on and off. Agree on acceptable appearance from the planned viewing positions and record the evaluation conditions.
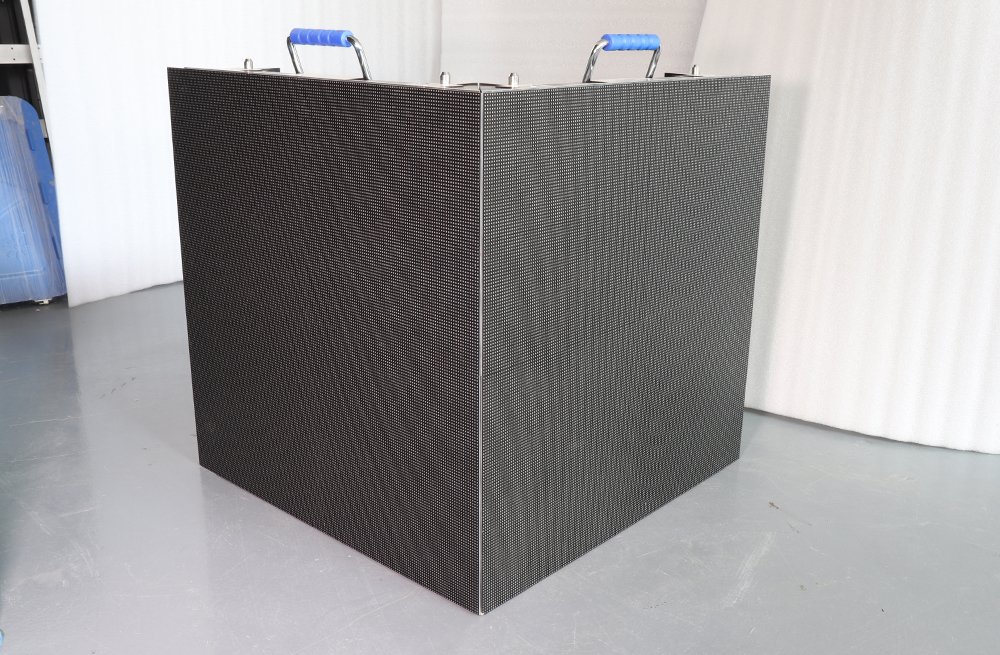
Separate factory checks from site acceptance. Factory assembly can verify component fit and content mapping, while the installed location reveals final sightlines, surrounding light, access restrictions, and building interfaces. Require the same configuration identifiers on the approved sample, order, and delivered equipment.
For the right-angle LED display handover, collect cabinet and cable maps, controller backups, calibration records where applicable, spare-part references, and a demonstrated replacement procedure. Clarify which organization handles hardware, content, controls, and building work when an issue occurs. These responsibilities should be agreed before the screen becomes part of daily operations.
Include receiving checks in the purchase plan. Ask for package labels that correspond to the cabinet schedule, photographs of the protected corner edges, and a packing list separating installed equipment from spares. On arrival, record visible damage before assembly and reconcile quantities against the approved schedule. Clear identification helps the installation team locate special parts without opening every package.
Product demonstrations on the EagerLED YouTube channel can help explain an assembly method, but request a demonstration of your selected configuration before approval. Save the agreed test patterns, content files, settings, and viewing positions with the acceptance record. This gives the owner a repeatable reference after a repair or a future content change, instead of relying on memory of the original demonstration.
8. Frequently Asked Questions
01. Can I extend an existing flat LED wall around a corner?
Possibly, but only after checking the existing cabinet revision, edge design, modules, controls, and available matching parts. Ask the supplier for a compatible extension drawing and a color-matching plan. A matching nominal pitch alone is insufficient evidence.
02. Can the two faces have different widths?
Yes, a layout can use unequal face widths if the cabinet grid, supporting structure, and controller mapping support it. Supply each face’s dimensions separately and ask the content team to design for the resulting canvas rather than assuming equal halves.
03. Does a cube screen need LED panels on the top and bottom?
Not necessarily. Specify every active face explicitly. Four vertical faces, an illuminated top, and a fully enclosed six-face object have different quantities, support requirements, and maintenance constraints. A cube rendering does not define the supply scope.
04. Should a quotation include a spare corner assembly?
Ask which corner components differ from ordinary face components and how quickly replacements can be obtained. Base the spare package on those differences and the acceptable downtime. Standard flat modules may not cover every corner-specific failure or mechanical repair.
05. Can a right-angle LED display use a standard video file?
Yes, if the player accepts the file and the image is mapped appropriately. Decide whether to scale it across the whole canvas, crop it, or repeat it on each face. Test that choice because conventional rectangular artwork may lose important information at the turn.
06. How should I compare warranty offers?
Request written coverage, exclusions, claim procedures, and responsibility for freight, labor, access equipment, and on-site work. Confirm how replacement parts are matched to the installed configuration. A stated warranty duration alone does not describe the actual service commitment.
Get a Quote Based on Your Corner Layout
Prepare a marked plan showing both faces, the corner profile, closest viewers, installation height, and maintenance access. Add the intended content, operating schedule, environment, delivery city, and required completion date.
Then send your right-angle LED display requirements to EagerLED for a configuration review and itemized quotation. Ask for the cabinet schedule, corner drawing, pixel map, and explicit scope exclusions together. Those documents make the proposed design easier to compare, approve, and install.